
 Of
all the various components in tentmaking, perhaps the hardest job is
deciding what you want your tent to be and generating the design from
those specifications. The rest of the process can be tedious for
those who are not handy with fabric, and enough has been written
about that elsewhere in this series of columns. But having the design
right in the first place, and knowing in advance what the tent is
(and isn't) expected to do, is the step that makes all the subsequent
steps possible and determines their ultimate success. So in this
column, let's look at the design process, step by step, as I tell you
how I put together a tent design.
Of
all the various components in tentmaking, perhaps the hardest job is
deciding what you want your tent to be and generating the design from
those specifications. The rest of the process can be tedious for
those who are not handy with fabric, and enough has been written
about that elsewhere in this series of columns. But having the design
right in the first place, and knowing in advance what the tent is
(and isn't) expected to do, is the step that makes all the subsequent
steps possible and determines their ultimate success. So in this
column, let's look at the design process, step by step, as I tell you
how I put together a tent design.
Last winter, I found a frame for a "market umbrella" -- one of those umbrellas with a wooden frame that you see in malls and sidewalk cafes -- in a thrift store. I bought it for ten dollars. Making a tent using one of these frames as a structure had been kicking around in my head for some time, and this acquisition put the project into high gear.
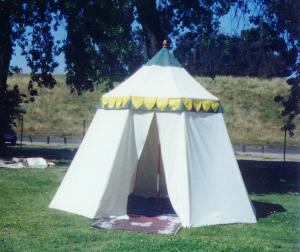
I've seen a lot of tents that use market umbrellas as a basic structure. The figure below shows a typical rendition of the design. In theory, it's one of the simplest tents to improvise ... just buy a market umbrella and contrive some sort of sidewall for it that attaches to the ends of the spokes (or is sewn to the border of the umbrella fabric) at the top and stakes into the ground at the bottom. At the site, insert the center pole of the umbrella into a "portable hole" (or have somebody hold the pole up), stake down the bottom of the sidewalls, and voila! Instant pavilion!
In practice, though, it's hard to keep the thing from looking like anything but a market umbrella with sidewalls. The top is a bit too flat to give it a truly "period" profile. And unless the top's fabric is really water-repellent, the design won't shed water very well. As sunshades, they work well, but they weren't really designed for foul weather protection.
Not having the fabric for my particular frame freed me from the temptation of somehow incorporating it into my design, and allowed me to build the tent around a different set of specifications:
1. The tent had to be lightweight and break down into easily portable segments ... ideally, enough to allow me to carry it onto an airplane as checked luggage if I ever felt the need to do so.
2. It had to be sufficiently weatherproof to hold up to the kinds of rain and winds we get at events.
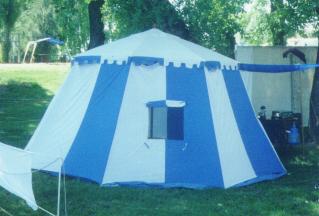
3. It had to have the appearance of a typical round tent of the period.
4. It had to set up in a minimum amount of time ... ideally, fifteen minutes or less.
5. It had to be large enough to set up a single military cot in, and still have plenty of space for setting up a small kitchen and a table. I intended to use the tent for those events where my household isn't going with me and I didn't want to take along all the other stuff I usually schlep around.
The market umbrella frame, when disassembled, was compact enough to meet Spec #1. It even came with its own handy breakdown fitting. Spec #2 dictated that I make at least the roof section out of a heavy canvas. The market umbrella frame also dictated that I make the walls out of a much lighter cloth, since I didn't think the frame was strong enough to carry the load of a heavier canvas. So for the sidewalls, I used a seven-ounce cotton twill. (This stuff is not flame-retardent, which is why I'm not currently planning to market this design. An all-cotton cloth is a little little less flammable than a synthetic cloth or cotton-synthetic blend, and therefore a little safer for use in tents, but it still falls short of the standards required for commercial tentage in California.)
I made the roof out of Sunforger, with a Fyrecoat top cone, valance, and billets. The Sunforger I had around the shop was 35" wide, and that is one reason I designed the panels to be 33" at the base. And, yeah, I lost a bit in wastage that way, but I had a lot of roll ends that were too short to make anything else out of, and this seemed to be the logical use for them. Had I been interested in saving cloth, I would have seamed the wasted triangles together from one panel to form another panel of the same size. And had I been interested saving more weight, I would have eliminate the billets, which only serve as decoration, but I'm a sucker for a pretty design and, anyway, people expect me to do the senselessly artistic thing, and I didn't want to disappoint anybody.
The other reason I designed the panels to be 36" at the base is that I wanted to shorten the spokes of the umbrella and therefore reduce the "lever arm" forces acting on the slider mechanism. These spokes weren't designed to have the downward forces of the sidewalls acting on them, but my gut feeling was that shortening these puppies a few inches would do the trick. It turned out that by shortening them five inches, the points would be about 33" inches apart ... enough to accomodate a 35" cloth and leave enough on the sides for a seam allowance. So that is the amount I shortened them. I am prepared to give you a reasoned, mathematically opaque explanation full of arcane formulae supporting my decision to shorten the spokes exactly five inches, but I warn you ... I'll wink.
Most period rounds had a roof pitch of at least 1:1 so to satisfy Spec #3, I designed my roof to have the same. That, of course, meant that the peak of the roof floated more than a foot above the top of the center pole of the umbrella. The difference was made up by using a removeable extension to the center pole made of a short piece of pipe. I unscrewed the finial from the top of the center pole and attached it to the peak of the roof with a small wooden plug sized to fit nicely into the pipe (in much the same method as my round tents use to connect them to their center poles). The length of the extension pipe was determined empirically -- that is, I tensioned the umbrella frame, stuck the wooden plug into the end of the untrimmed pipe, and pushed up until I could push no more, and noted where the top of the umbrella's original center pole lined up with the pipe. I then took the pipe back out and whacked off the excess. Finally I installed a small piece of rod in the original finial hole at the top of the center pole to help position the extender and keep it from slipping off when it was tensioned.
Another requirement that helped satisfy Spec #3 were the flared sidewalls. The sidewalls flare out about three feet on a side -- three times as much as my other tents -- because I also wanted to eliminate the guy ropes to save weight and set-up time. I wasn't entirely willing to trust the fabric to take up the job of the ropes, though, because cotton stretches a lot. So I sewed a light but very strong Nylon webbing (MIL-T 5038 Type III, if that means anything to you) into each vertical seam to actually carry the load.
If it turns out that the design will need ropes anyway, I've allowed for that contingency. The roof is held onto the umbrella spokes with lag screws, which I can replace with eye screws if I need to attach a rope there.
Since the umbrella was an octagon, there would be eight panels in the sidewall. The cloth came 60" wide, so allowing for seams, the floor of the tent would be an octagon about 12' wide measured across the points, or 11' measured across the flat sides ... about the same size as my 11' octagons. The usable interior space, of course, would be less, since the walls slope more sharply, but I figured that I'd still have enough space to satisfy Spec #5.
I thought seriously about sewing the top of the sides to the roof. If I were willing to sacrifice some portability, I would have done so, since it would have saved the weight of sixteen S-hooks. But it would have made a single unwieldy parcel of two somewhat more wieldy parcels, so I opted to have them detach. That also gives me the option of washing the sides in a conventional washing machine.
The walls are currently hung from the eight umbrella spokes with eight S-hooks, but I've decided that this arrangement doesn't provide quite enough support on top, so I'll sew eight loops onto the inside of the valance, midway between the spokes, and use eight more S-hooks. I've also found that the eight stakes at the bottom of the sides don't provide enough of a seal with the ground. The stakes are all 12" wrought-iron stakes ... remember that they're also acting as guy stakes ... and I don't really want to use eight more of them (they weigh about a pound apiece), so I'll use 8" or 12" "wire-spike" stakes with washers instead. I'd suspected that these would be necessary, so I sewed the reinforcements in when I made the sidewalls.
The design goes up with a portable hole, which is itself a pretty heavy piece of hardware, but isn't necessary if I can enlist somebody's help to hold the umbrella up while I hang and stake out the sidewalls. This particular portable hole is many times the strength (and weight!) of the ones used to hold up banners, but the structure's top-heaviness can generate a lot of bending force, and the conventional portable holes aren't up to the task.
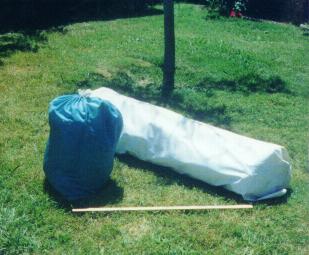
So how well has it met the design specifications? As the figure below shows, it breaks down into two packages of manageable proportions. That stick on the ground is a yard-stick (which, for those of you who live in more metrically civilized countries, is about 90 cm long). Everything is in the bags, including the tent fabric tent, fitted ground cloth, frame, portable hole, and stakes ...even the hammer. Total weight is 70 pounds (32 kg), although the additional S-hooks and stakes will add another three or four pounds. There's enough room in the bags for a small awning if I decide to make one for the tent (at the penalty of maybe another ten pounds or four and a half kg, I think).
From bags to stake-down, set-up time is about ten minutes. Break-down time is about seven minutes. The tent hasn't been in any extreme weather yet, although one of the places it was set up was quite breezy and it seemed to shrug off the wind without complaint. We'll see how it fares down the road. I don't have much concern about leakage, since the roof fabric has had a good track record. I expect the sides to leak a little, but the water will probably run obediently down inside the fabric and onto the ground without dripping on anything inside.
I hope you've enjoyed this little tour into the mind of a tent designer. The trick to making a successful tent, like making a successful journey, is knowing where you want to go before you start out and the likely routes you're going to use when you are underway. If you let your eventual use of the tent be the guide to its design, and not the other way around, you will be a lot happier with your creation. Good luck, and if I can help you in designing your own dream tent, just let me know.
August, 2004 I gave this pavilion to a friend of mine shortly after I made it, to see if she could find any design flaws in real-life testing. I've had to replace two of the tent's six struts (or ribs, or spokes, or whatever you want to call them) so far. I'm not sure whether the struts are breaking because of the way she loads it into her car, or if it's a setup problem. Other than that, it's still in good shape, and my tester has used it about four or five times a year.
April, 2007 After the lady I gave the tent to passed away last year, I got it back from her family and have used it a few times since then. It's held up well, although a little mildew had gotten to the walls. The mildew came out (mostly) with chlorine bleach, as described elsewhere on this site. I'm very glad I made the sides detachable, since doing so simplified the treatment process. There has been no further strut breakage. I've made a little awning to go onto tent and give the doorway some protection from rain and sun.
Other articles you can read, mostly on tentmaking and medieval tents